
The Journey
As I mentioned in Bring Intentionality to Your Closet, I took Seamwork’s Design Your Wardrobe Fall 2022 class to select clothing to make that would become my staple wardrobe pieces. Through the process of designing a collection I decided I wanted a look that was:
- Tailored: energy flows through intentional lines, shapes, and seams; fits well for movement; does not restrain
- Tactile: kinesthetic, supple, and soft; inviting touch
- Remarkable: savors the unexpected details, materials, and lines; rewards longer looking
- Vigorous: chewy and complex
The Jasika Blazer and Sasha Trousers by Closet Core looked perfect for a DIY everyday business suit. [Note: Closet Core used to be Closet Case. Name change.] I found some dark indigo denim from Mill Ends that will make a great foil for shirts made from statement fabrics.

Finding help
I wanted to act on my project plan by first making the blazer. A friend told me about Sunny Girl Studio’s Intro to Tailoring class. Offered through Hello Stitch, a virtual studio that offers online instruction, this 5-week Zoom class taught by Beth Galvin walks through the construction of a tailored blazer using modern (fused interfacing rather than handstitched) tailoring techniques. I signed up. What I discovered later is that Closet Core also offers a Learn to Sew a Classic Blazer class and it includes the cost of the pattern. I’m still thinking about whether to take this as well.
Select a size
To make a muslin, first I needed to choose a size. Seamwork, a membership-based sewing community, offers a Fitting Class with a Fitting Journal. The included Size Calculator helped me think through what size to make in an organized way. Essentially, you take the Finished Garment measurements for a particular size:
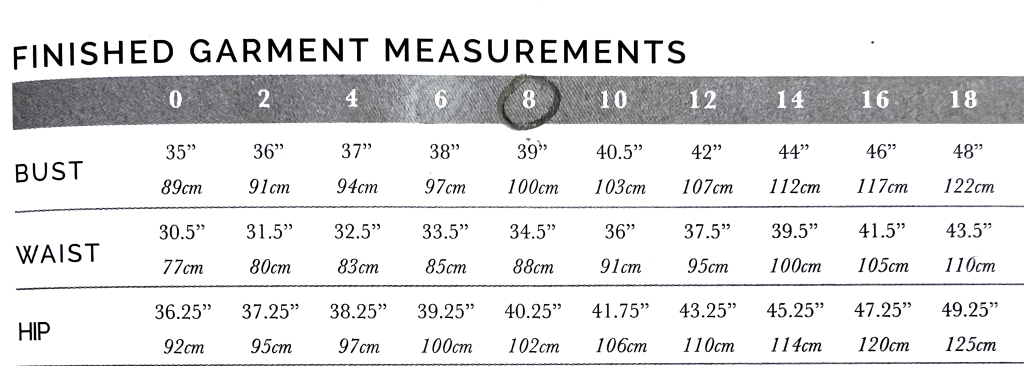
Then subtract your own measurements from the finished garment measurements to get the number of inches (or cms) of ease. This ease includes both basic wearing ease and the ease required to achieve a certain style like loose fitting, semi-fitted, etc.

But what is the right amount of ease? An Intro to Tailoring classmate showed me this chart of ease guidelines from Something Delightful, a site that offers sewing patterns. I chose semi-fitted as my style goal which meant going for 4” of ease in the bust. I easily backed into the size from there. I would have made a size 4 without this math exercise. Instead, I chose a size 8.
Constructing the muslin
I traced the pattern pieces that I would need to assess fit: front and back bodice, side panel, upper and under sleeve, and under collar. I put these on muslin fabric and cut them out.

I sewed up the muslin (but haven’t added the collar yet) and put it on my Beatrice Dress Form. The dress form is based on my measurements. Here’s how it looks on the form
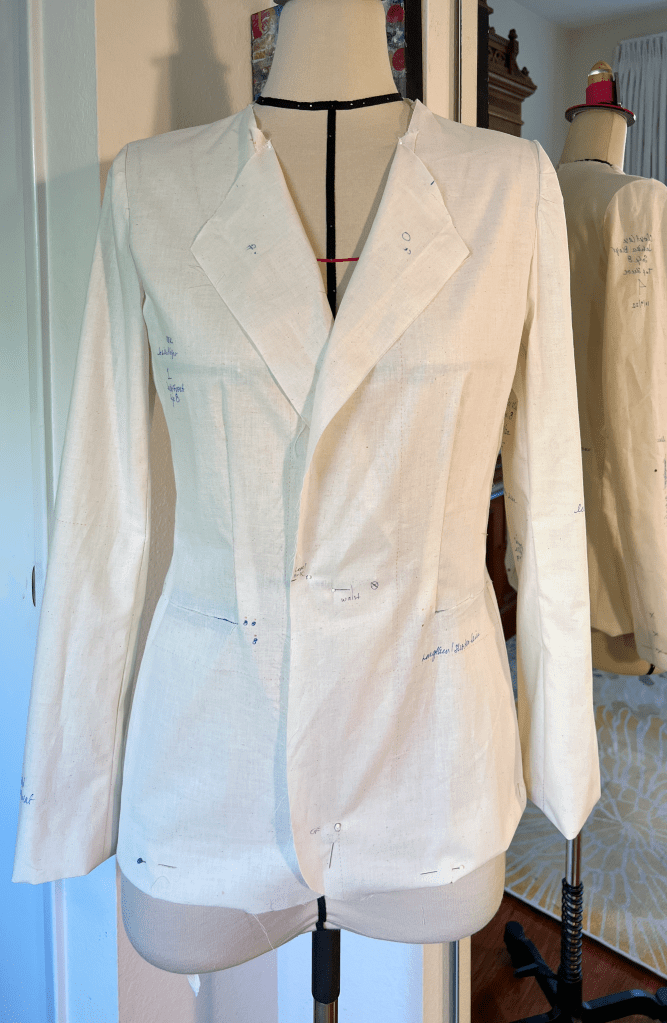

While it’s pretty close, I still have work to do. There are vertical drag lines on the front shoulder and in the back from the shoulder blades down. But I am SOOOO glad I didn’t make a size 4!
For next week, I’ll use Seamwork’s Muslin Checklist to evaluate the muslin fit further. Then I’ll work on fit adjustments and make those changes in the pattern. I’ll share it all with you next week!
Resources
- Bring Intentionality to Your Closet
- Jasika Blazer and Sasha Trousers by Closet Core
- Intro to Tailoring by Beth Galvin, aka Sunny Girl Studio
- Learn to Sew a Classic Blazer by Closet Core
- Seamwork
- Ease guidelines by Something Delightful
- Beatrice Dress Form
As you can see by the number of links to resources, there’s a lot of knowledge and skill required to make a garment and especially a tailored one. You have to create your own DIY roadmap because that knowledge is not connected along your journey. [I receive no compensation from these links or businesses.]
If you’d like an easy way to follow my journey and benefit from my roadmaps, subscribe to receive a weekly update.
