
I just finished designing and making a bag for my mom. She really enjoyed knowing more about how her bag came to be. I thought you might too.
She and I talked about how she planned to use this bag on long trips in the pickup truck where it would sit on the seat or the floor. She’d reach into it for legal pads, file folders, pens, cell phones, keys and quite possibly her grandchildren’s toys.
She let me know that she carries her bag on her left side, with bag top snug under her arm and that her left shoulder is a little tender. She never carries her bag crossbody nor below the hip.
“Design is a plan for arranging elements in such a way as to achieve a particular purpose.”
Charles Eames
I translated how she planned to use the bag into design objectives. Each objective has elements that I arrange.
Design Objectives
| How the bag will be used | Design Objectives | Elements |
| Context: Long trips in a pickup. The bag sits on the floor or seat | * Bottom protected by material choice * Bottom weighted to mitigate tip overs * Small enough to be in the seat next to you * Dark outer to minimize visibility of dirt stains | * Leather corners * Black Denim outer |
| A variety of contents | * Large enough for legal pad and file folders * Separate compartment for pens and cell phone * Small items like lipstick, keys | * Sized for folders * Zippered inside pocket sized for future cell phone releases * Separate leather pouch pleasant to the touch for small items * No dividers and a rounded shape when open makes catchall and retrieval easy |
| Tender left shoulder carry | * Minimize bag weight and bulk * Minimize strap width * Strap length for over shoulder carry * Inside zipper easy to open with right hand | * No hardware because of the weight it adds * No Soft and Stable interfacing because of bulk * 3/4″ wide straps rather than 1″ * 17″ strap length rather than 25″ or longer * Zipper head pointed toward front when closed |
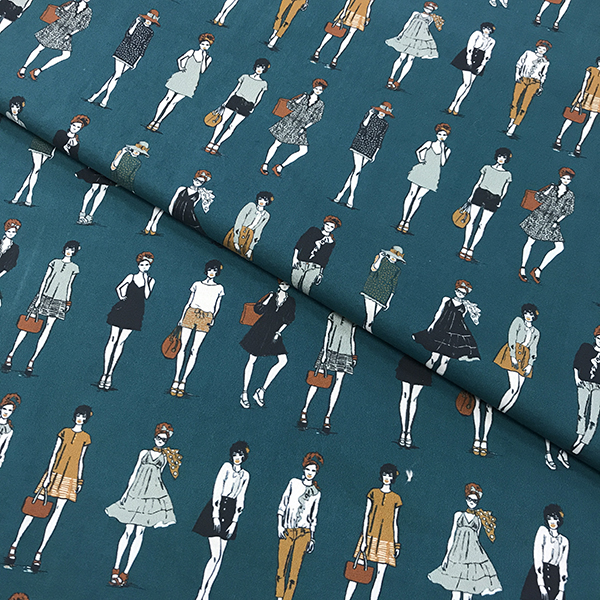
| Mother of girls who are grown women now | * Lining motif as expression * Not abstract | * Lady McElroy Fashion Models interior |
Materials
The next big chunk of work was sourcing the right materials for the design objectives and the elements. It was easy to spend hours looking for just the right thing. The materials for this project came from across the U.S. from about 6 suppliers.

The heavy black denim outer was from the Textile History Museum in Glencoe, North Carolina. I bought it on an outing there when I was visiting family there. The museum had a little shop of odds and ends and included was this fabric. It’s a lovely reminder of a fun time.
The leather for the corners was from Oregon Leather in Portland, Oregon. I selected it for the contrasting warmth of the chestnut color, the soft feel, and the thinness for sewing with thread.
Searching for lining with a woman or girls’ theme that was not abstract was the next challenge. The best lining I first found on Etsy from a seller in the UK. However, the duties and shipping charges were prohibitive. Fortunately, some time later I found this fabric on-line from Hart’s Fabric in Santa Cruz, CA
The zipper, rivets and straps were also intentional selections. You’ll see them in the final product.
Process

Once I gathered most of my materials, I began to sew. Just like I needed multiple suppliers, I also needed multiple machines. The industrial Consew with an outboard motor at my local maker space, Maker Nexus, was useful when stitching the leather to the outer and when stitching the outer together. That sturdy walking foot made sure nothing moved. The powerful motor made sure the needle went through 2 layers of denim and 2 of leather.

I used my home machine on other parts like sewing the zipper into the lining. The Consew did not have a zipper foot so I couldn’t use that anyway though I would have liked to. I used my home serger for the lining seams.

The bag was a bit floppy at this point because I had decided to forgo Soft and Stable interfacing to cut down on the bulk that would occur under the arm. Instead, I learned how to make bias piping that gave the bag more shape so that it would stand open. The lining, piping and outer turned out to be hard to sew together because it was 7 layers of material with a big difference in weight between the lining and the outer. Complicating matters, I had to sew the seam on my home machine to get the right thread color on the interior. (Getting industrial weight thread the right color for the Consew was a bridge too far.)
I tried using a zipper foot and double stick tape to keep everything in place and me sewing near the edge of the piping but that didn’t work. After the 8th attempt (I kid you not) I finally got a seam around that I was pleased with by using cold tape to back the lining, a regular foot, some double stick tape and binder clips.
When I chose the leather straps I chose a smaller width, ¾” instead of 1”, to be less bulky and heavy on her tender shoulder. I experimented with brass, black, gold and silver rivets. I had thought gold would be best but it just didn’t look right. I selected silver in the end. All my rivet practice on other bags came in handy.
The Final Product
I am very pleased with how this bag turned out. I’m particularly happy that it stands up on its own without interfacing. The bias piping exerts an outward force that the riveted leather handles amplify. Together, those forces hold up the sides. It’s almost like architecture.
I included a zippered leather pouch for small easy-to-lose items like lipstick, hand cream, and small parts you take with you to the hardware store to find a replacement for.
I hope this bag is a helpful companion for my mom.


